
Edit an Existing Page
To edit a page, there are two possible ways of doing so.
First, click ‘Pages’ on your sidebar. When you arrive, click on the name of the page that you would like to edit, or hover over its title and select ‘Edit’.
The second way of editing an existing page is by clicking ‘Edit Page’ in the top toolbar when on the front end of the specific page, which will bring you to the backend of that page.
When you have finished editing all content, click ‘Preview Changes’ to view your changes, or click ‘Update’ to save and publish your changes.
Add a New Page
To add a new page, click ‘Pages’ on your sidebar. Once on the ‘Pages’ screen, click the ‘Add New’ button, located at the top of the page. Start by entering the title of the new page you would like to add. This title will be incorporated into your website’s URL.
The new page title and address will be labelled as a Permalink (the URL link of this page) underneath the title box. If you would like to change the name of this Permalink, click ‘Edit’ next to the URL, enter your desired title, and click ‘OK’.
Select a template from the drop-down list ‘Templates’ found under the section ‘Page Attributes’. For non-custom pages, utilize the ‘Pattern Library’ template.
Add a New Module
Once you’ve selected the ‘Pattern Library’ template for your new page, you’ll have access to all modules within your custom-built pattern library. Think of the modules as building blocks that will help you create your new page.
To browse the modules available, visit your pattern library here. To add a new module to your page, hover over the blue ‘Add Module’ button to see the listing of modules by name. Select the one you’d like to add, and begin adding content to the relevant fields.
Add a Link
To insert a link into a content module, highlight the copy that you would like to hyperlink and click the link icon in the toolbar. Paste the URL into the field.
If it is an internal link, you can type to search for the correct page. If the URL is an external link and you would like the page to appear in a new tab when users click on the hyperlink, click the settings icon beside the field and checkmark ‘Open link in a new tab’.
If you would like a file (e.g. PDF) to be hosted on your website, add the file to the Media Library and copy the link provided in the attachment details.
Add an Anchor Link
An anchor link allows you to link to a specific section on a page. To insert an anchor link, checkmark the checkbox at the top of the module (if available).
Type in the identifier within the ‘Anchor Link’ field. Please make sure the text is lowercase and has no spaces (you can use dashes). i.e. ‘content-block’ or ‘mission-statement’.
To create the link, add the identifier with a # in front of it at the end of the page link.
e.g., https://sensplex.ca/training-manual/how-to#edit-existing
Add Meta Title & Description
To add a meta title or description on any page or post, locate the ‘Yoast SEO’ section and fill in the text fields ‘SEO title’ and ‘Meta description’.
Best practice is that every unique URL on your website has a unique Meta Title and Meta Description.
Meta Titles: max 70 characters
Meta Descriptions: 107-150 characters
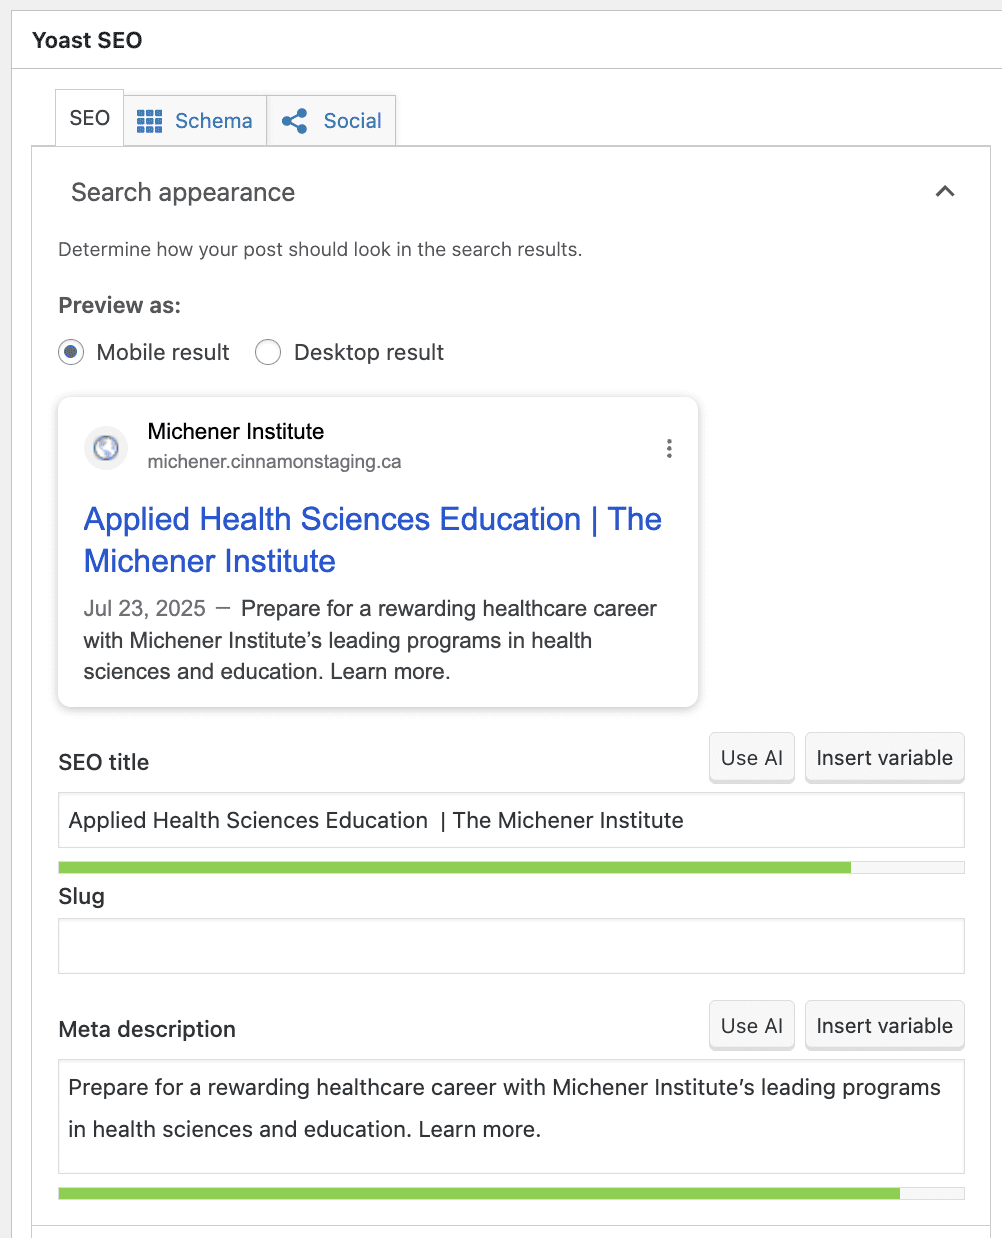
Edit or Use Page Settings
Preview a Page
At any time while creating or editing a page or post, you can preview your work by clicking ‘Preview Changes’ in the ‘Publish’ box (located in the right column).
This will open the front end of the page in a new window, displaying the non-saved changes. You can either go back to your editing screen and click the blue ‘Update’ button or continue tweaking your layout/content.
Update, Draft or Publish a Page
At any time you can update your page by clicking ‘Update’. You can also save your new page/post to edit later by clicking ‘Save Draft’, or alternatively click ‘Publish’ to publish the new page.
Remove or Hide a Page
To remove a page, hover over the title of the page that you would like to remove. The post will expand to show various fields, including ‘Trash’.
Click on the ‘Trash’ button to delete the page.
Remember to remove the page from the navigation by visiting ‘Appearance > Menus’.
Note: A page can also be removed by clicking ‘Move to Trash’ within the ‘Publish’ section on each page.
To hide a page, change the ‘Status’ within the ‘Publish’ section on the page you would like to hide from ‘Published’ to ‘Draft’.
When you have finished editing, click ‘Update’, or ‘Cancel’ if you wish to go back without making changes.
Add Images, Videos & PDFs to Your Site
To add images, videos, and PDFs to the Media Library, click ‘Media’ on your sidebar. When you arrive at this page, click ‘Add New’ at the top of your screen. You can drag or upload new media.
On the left-hand side of this page, you will see a section titled ‘Media Categories’. You can create multiple custom tags and use them to keep media organized within the Library. Select as many tags as you’d like to easily manage your Media Library as it grows.
To ensure your site stays optimized for speed, make sure your images have been sized properly and are a maximum of 2MB (recommended 1MB). Use the Squoosh web app to reduce the size of your images if required.
View a comprehensive list of recommended image sizes (dimensions) for the various images across your site here.
Alternative Text
Whenever you upload an image to WordPress, you will see a number of fields that you can fill in, including your image’s title, caption, overall description – and alt text.
We recommend keeping ALT text short and concise – best practice is 125 characters or less. Remember, every image on your site should have ALT text to maintain AODA compliance (unless the image is ‘decorative’).
PDFs
Upload PDFs to your media library to generate a ‘file URL’ which can be found within the image details.
To add a PDF link to a page on your site:
- locate the PDF in the media library
- click on the ‘copy URL to clipboard’ button
- open up the page where you want to add the PDF link
- begin creating a link (via a text link or a button)
- paste the PDF URL into the URL field
- check the box to ‘open link in a new tab’
Videos
To add a video to your website, use the ‘Content Module’ then select the ‘Video’ media type from the pattern library. We strongly recommend against uploading videos directly to the media library as the files are too large and will slow down the site.
When embedding a video, you’ll need to grab the video ID, which is typically found at the end of the URL:
- For YouTube: https://www.youtube.com/watch?v=YSO9QoN3yzQ → The video ID is ‘YSO9QoN3yzQ‘
- For Vimeo: https://vimeo.com/347119375 → The video ID is ‘347119375‘
Use this ID in the appropriate field when adding the video to ensure proper embedding.
- In WordPress, under ‘Tools,’ select ‘Redirection.’ All redirects will be listed here.
- To add a new redirect, select ‘Add New’ at the top of the page.
- The ‘Source URL’ will be the URL slug from which you want to redirect (i.e. the URL slug as it existed on the old website)
- The ‘Target URL’ will be the URL slug that you want to be redirected to (i.e. the URL slug as it exists on your new website).
- Select ‘Add Redirect’
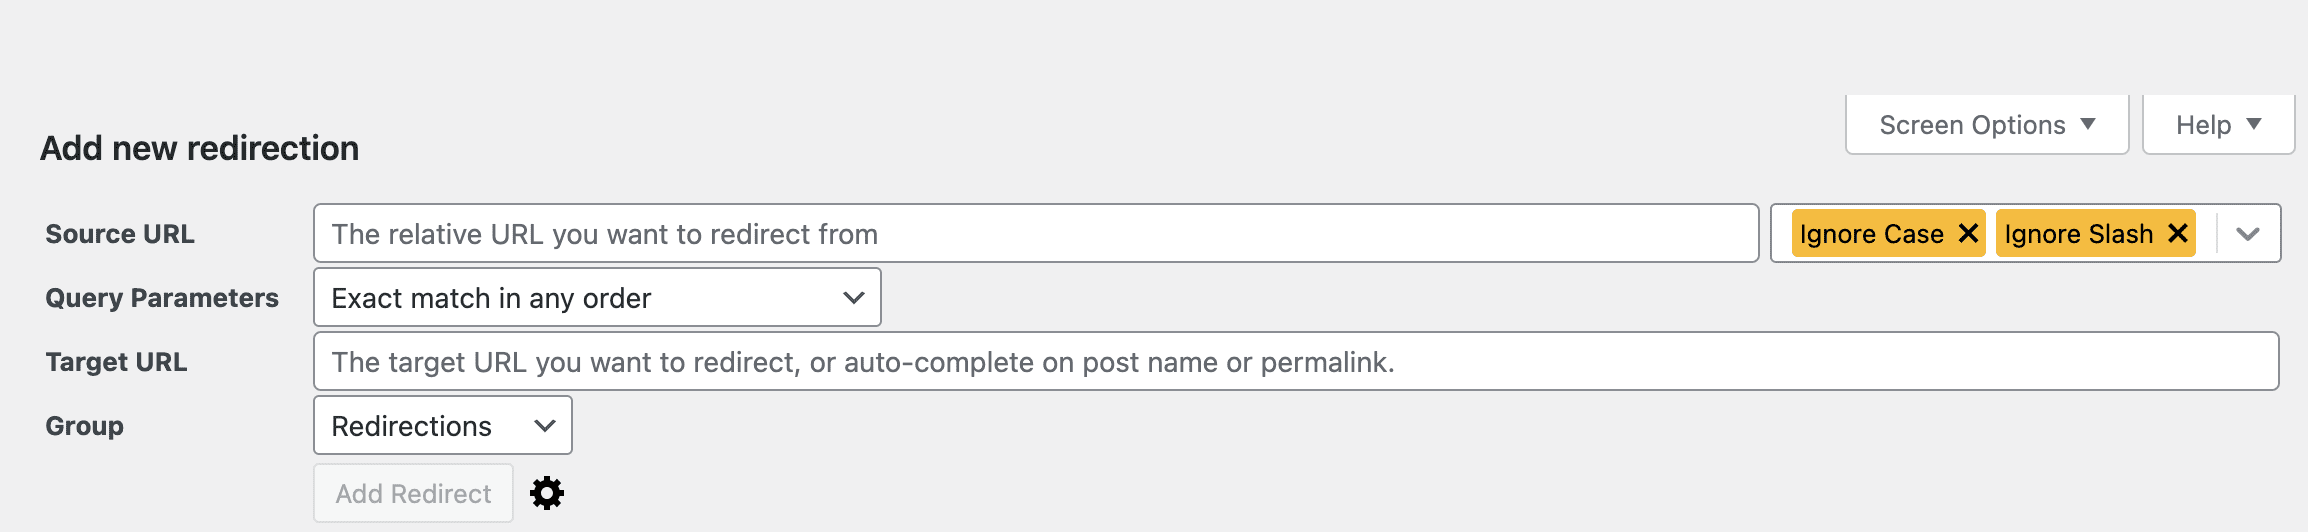
You can edit, delete, or disable redirects by hovering over the redirect within the list.
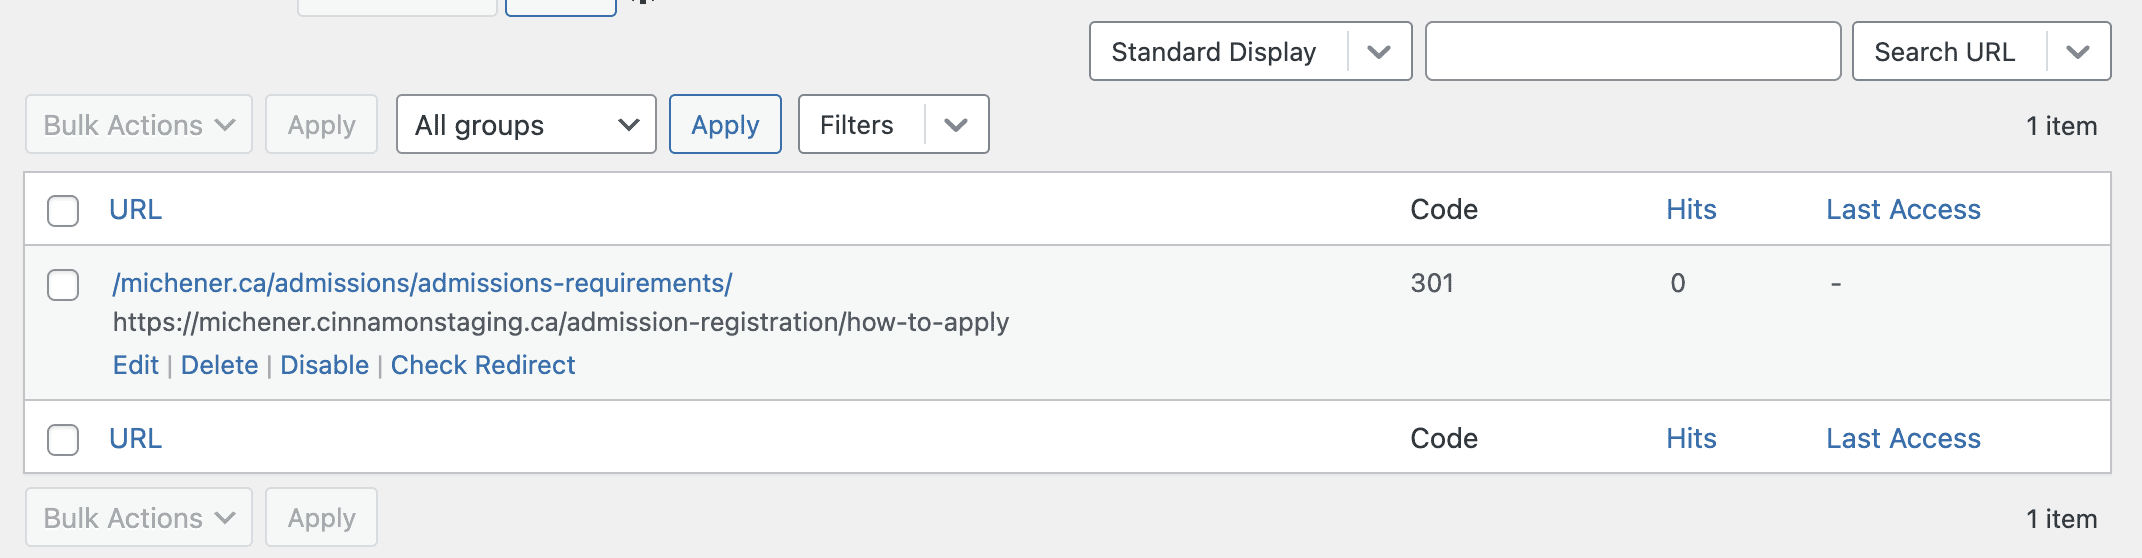
You can also select ‘Check Redirect’ to ensure that the Redirection is behaving as expected.
Note:
- The ‘URL slug’ signifies the part of a URL that comes after the domain and identifies a specific page (e.g. https://www.cinnamontoast.ca/studio)
- Pages that will have the same URL on the new website as they did on the old website do not need redirects. Adding a redirect with the same URL will cause the page to produce an error.
- Redirects can only be applied to a Source URL within the website domain.